Thursday, 5 May 2016
Tuesday, 3 May 2016

Construction: Editing process
Once all the filming had been finished we decided to start filming. This meant we had to import all footage from the camera onto the Mac so we could start editing. For editing we decided to use Adobe Premire Pro CS6. This type of software is particularly good as it allows easy editing and gives a wide range of effects, transitions and other features that allow you to develop footage even more.


To get these effects we had to look for video effects that allowed me to change the colours and another which would allow me to mirror the clip.


The different effect options above allowed me to change the colouring within the clips and the mirroring. I changed the input and output levels of black and white to make shadows and dark areas look more bold and dominant within each clip to make it that bit more scary and horror like. This made it much like the Solstice's opening again as they have very dark and dominant sections of there titles.
Another area of the opening i have edited a lot to show darkness within the clip is one of the last ones. This clip really represents a stereotypical villain as they have a weapon and you don't actually see the villain either. These are common horror conventions that you would expect to see within horror films as we found out in our survey.
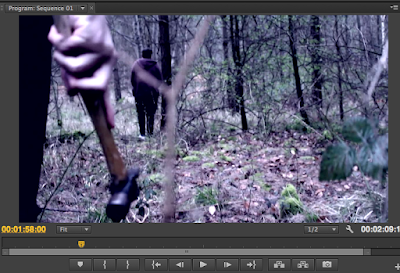
During this scene I also changed the speed of the clip to make it more tense and add suspension. I did this by slowing down the clip to around 65.3% of what it would of normally been. This slows it down enough for the audience to experience the tension and listen to the suspense which has been built up.


Video Editing
Once we had opened up and started the program, we had to insert all of our footage onto the program. This just meant dragging and dropping all the footage from the camera and putting it into an area on premiere pro, as seen below.
After we had imported all footage we wanted we could start to add them onto the editing reel and put them in the order we wanted. When we were putting them in order we had to cut and edit some of the clips to make sure that it was only what we wanted out of the clip that we put on. For example, there could be a couple of seconds of a clip that we didn't want to have in it so we would trim it to make sure that it adds more and better continuity.
To make sure that the opening was as horror like as possible i looked at changing the colours within each clips, the main effect change within the opening are the titles. As you can see from the images below, the titles have a very yellow/green effect throughout that makes it creepy and spooky. We were inspired to use this type of titles by the film 'Solstice'. We not only took colour inspiration but we also implemented how they had use a mirror effect to make the titles more spooky and quite disturbing.
 |
| 'The Campout' Opening Titles |
 |
| 'Solstice' Opening Titles |


The different effect options above allowed me to change the colouring within the clips and the mirroring. I changed the input and output levels of black and white to make shadows and dark areas look more bold and dominant within each clip to make it that bit more scary and horror like. This made it much like the Solstice's opening again as they have very dark and dominant sections of there titles.
Another area of the opening i have edited a lot to show darkness within the clip is one of the last ones. This clip really represents a stereotypical villain as they have a weapon and you don't actually see the villain either. These are common horror conventions that you would expect to see within horror films as we found out in our survey.

During this scene I also changed the speed of the clip to make it more tense and add suspension. I did this by slowing down the clip to around 65.3% of what it would of normally been. This slows it down enough for the audience to experience the tension and listen to the suspense which has been built up.
Construction: Reflection On Recording
On reflection of our recording, we did happen to run into some problems along the way. These problems included camera issues, time management and weather.
First of all, as we started recording for the first time, it was going well with no problems at all. Unfortunately the camera ran out of battery so this affected a couple of things for us. This could of been avoided if we had ensured that the camera was fully charged. Also, we found that the camera we were using wasn't the best of quality so we asked for another and were able to be upgraded to a much higher quality camera which would really improve our footage.
Another thing was time management. This was the main problem within our group as it took a while for us to get all the people we needed at the same place at the same time. Some people could do a certain time but others could not. This lead us to changing our cast a bit to suit the times that were preferred to the majority of people.
A problem which I discovered during the editing process was that our dialogue is not the best. By this I mean some parts a louder than others and some of the actors didn't speak loud enough which means they are quitter than others. This can be overcome however by simply increasing certain clips of the film whilst editing.
Some good things about our filming however included:
- Same type of weather kept continuity.
- Actors kept same clothes for continuity.
- We didn't have to re-shoot any scenes again once we had finished filming.
- Secluded area meant we were not disturbed.
These factors all helped us to ensure our filming was successful and recorded easily.
If we were to film again however, I would make sure everyone was available and that they all knew when we were filming. This saves us the hassle of getting new actors in at the last minute.
If we were to film again however, I would make sure everyone was available and that they all knew when we were filming. This saves us the hassle of getting new actors in at the last minute.
Construction: of making tittles

The image above shows how we have created titles for our opening. When making the titles we had to consider different things that would help to represent the horror theme within the opening. First of all we looked at the font it self. We thought it was best to keep the font as standard with a bold effect on it, just to make it that bit clearer. We had to consider how big we wanted the titles so we kept it at 51.0 font size throughout to ensure there was continuity. The font size is not the only thing we kept the same however as we made sure that every title was white. The white font makes it easy to read as it stands out and also can give a spooky effect when shadows are added. Once we were happy with our title we would add it to the specific part of the film where we wanted it to go.


Wednesday, 16 March 2016
Production: Raw Footage
This is some raw footage of our opening to our horror film. It shows that we have implemented some key media/filming techniques like 180 degree rule, shot reverse shot and high/low angle shots. We can edit this raw footage to add a lot more continuity to make it seem like a real opening to a movie. In this footage we have tried to make sure it is already quite continuous so that it has match on action for when each clip changes. What we have made sure also well is that we have filmed it all as quick as we can so that the time of day doesn't effect the continuity within the opening. this will then make the continuity a low standard as if we were to switch from light to dark to light, it would look out of place and will not flow as planed.
Tuesday, 15 March 2016
Construction: Evidence Of Filming Taking Place
This is the evidence that we have taken from the filming of our horror opening. It shows that we have all got involved with the filming process and help each other by adding constructive and relative ideas to the filming. It shows that we have used the location that we originally planned and have used the camera we were given. It also shows how we have used the trip-pod to get steady and effective shots to get the best out of our filming. The reason why there is not complete continuity throughout the pictures regarding jamie's clothes is because we had to re-film some clips as one of our initial actors unfortunately broke his leg within the time we were filming.
Tuesday, 1 March 2016
Planning: Filming Schedule

This is the filming schedule for our teen horror film called 'The Campout'. The main purpose behind a filming schedule is to make sure that when it comes to filming we are able to make sure that we get the certain shots filmed that we planned for that day of filming also to get certain shots done in a certain order because of their importance within the film. The filming schedule is vital as it ensures that the whole of the group that is filming as well as the actors know what is happening and when it will happen on that day of filming.
Tuesday, 2 February 2016
Planning: Storyboard
this is the storyboard for the opening of our film 'The Campout' the way we did it was simple in that we just created the panels using templates and shots from our opening. each panel included:
the shot number, the location, the type of camera shot, movement, angle and cast involved in this shot.
from doing this i have learnt that planning is a ver important phase in the production of films and our opening, as it is vital so that the filming and production can flow.
The purpose of doing story boards is so that we can see how the opening will look appear and have a plan for the shots that we will use in our film opening. It will also help us to gain an understanding with the opening titles on the two minutes. All of this will make it easier for us when we come to filming and editing our horror film opening.
Tuesday, 5 January 2016
Planning: Shot List
Shot number
|
Shot type
|
location
|
Cast required
|
Props required
|
Brief description
|
1
|
Establishing shot
|
Quarry entrance
|
none
|
none
|
Shot off the quarry woods where the cast will be situated
|
2
|
Panning shot
|
quarry
|
Brian, Alicia and William
|
bag
|
The group on their way to the camp location
|
3
|
Two shot Midshot
|
Groups camp
|
Brian and William
|
Vodka bottle
|
Brian asks to have some of the groups alcohol
|
4
|
Two shot Midshot
|
Groups camp
|
Alicia and William
|
Vodka bottle
|
Alicia passes Brian the vodka bottle
|
5
|
Midshot
|
Groups camp
|
Brian
|
Vodka bottle
|
Brian drinks from the bottle then offers it to William
|
6
|
Midshot
|
Groups camp
|
William
|
none
|
William isn’t keen on the idea of consuming alcohol
|
7
|
Two shot midshot
|
Groups camp
|
Brian and William
|
none
|
Brian mocks the idea of William being boring and not drinking
|
8
|
Two shot midshot
|
Groups camp
|
Alicia and William
|
none
|
Alicia persuades William to drink
|
9
|
High angle midshot
|
Groups camp
|
William
|
none
|
William feels vulnerable about the idea of getting intoxicated
|
10
|
Two shot
|
Groups camp
|
Brian and William
|
Vodka bottle
|
Brian insures William that he will be fine and that nothing bad would happen
|
11
|
midshot
|
Groups camp
|
William
|
Vodka bottle
|
William agrees to take the vodka but proceeds to spit it out after consuming it
|
12
|
midshot
|
Groups camp
|
Brian
|
Bottle lid
|
Brian passes the lid to William as he needs to go to the toilet
|
13
|
Two shot midshot
|
Groups camp
|
Alicia and William as well as Brian in the background
|
Vodka bottle
|
The group fret about what may happen to Brian as he goes to the toilet
|
14
|
midshot
|
The journey to the toilet
|
Brian
|
none
|
Brian walking to find a suitable place to go toilet
|
15
|
Over the shoulder
|
The journey to the toilet
|
Brian
|
none
|
Brian walking to find a suitable place to go toilet
|
16
|
Aerial/ crane shot
|
The journey to the toilet
|
Brian
|
none
|
Brian walking to find a suitable place to go toilet
|
17
|
Panning shot
|
The journey to the toilet
|
Brian
|
none
|
Brian walking to find a suitable place to go toilet
|
18
|
midshot
|
Brian finding a suitable location
|
Brian
|
none
|
Brian going to the toilet
|
19
|
Various close ups
|
The toilet location
|
Brian
|
none
|
Brian becoming anxious as he hears noises of twigs snapping all around him
|
20
|
Long shot
|
The toilet location
|
Mysterious figure
|
none
|
The all black figure in the background looking at Brian
|
21
|
Extreme close up
|
The toilet location
|
Brian
|
none
|
Screams as Brian is brutally murdered with a close up of his dead hand
|
22
|
Two shot
|
Groups camp
|
Alicia and William
|
none
|
Screams are heard by the rest of the group and they begin to worry
|
23
|
Two shot
|
Groups camp
|
Alicia and William
|
none
|
They decide to split up and William goes to look for Brian leaving them separated
|
24
|
Panning shots
|
The journey to the toilet
|
William
|
none
|
William following the route searching for Brian
|
25
|
Long shot
|
The journey to the toilet
|
Mysterious black figure
|
none
|
The black figure discovering William
|
26
|
Close up
|
The toilet location
|
William
|
none
|
William looking distraught as his discovers Brian’s body
|
27
|
High angle Midshot
|
Groups camp
|
Alicia
|
none
|
Alicia hears the screams of another character
|
28
|
Close up
|
Groups camp
|
Alicia
|
none
|
Alicia is very worried and decides to go looking for the other members
|
29
|
Panning shots
|
The journey to the toilet
|
Alicia
|
none
|
Alicia looking for the other members
|
30
|
Close up
|
The toilet location
|
Alicia
|
none
|
Alicia discover the others bodies, however the mysterious figure is over her shoulder
|
31
|
Midshot
|
The toilet location
|
Brian and William
|
none
|
The bodies covered in blood up against a tree, screams of Alicia can be heard
|
32
|
longshot
|
The toilet location
|
Mysterious black figure
|
none
|
The figure can be seen in the distance for the last time.
|
This is our shot list for the production of the opening 2 minutes. It is important to have a shot list for the production as it allows us to make sure we've filmed everything that is needed to piece together the opening and in the right order of events. This links back to the storyboard as these are the shots needed for the storyboard panels. This will then make the recording phase quicker as we will get to the location and get straight into the recording.
Subscribe to:
Comments (Atom)